 Farhan hamdan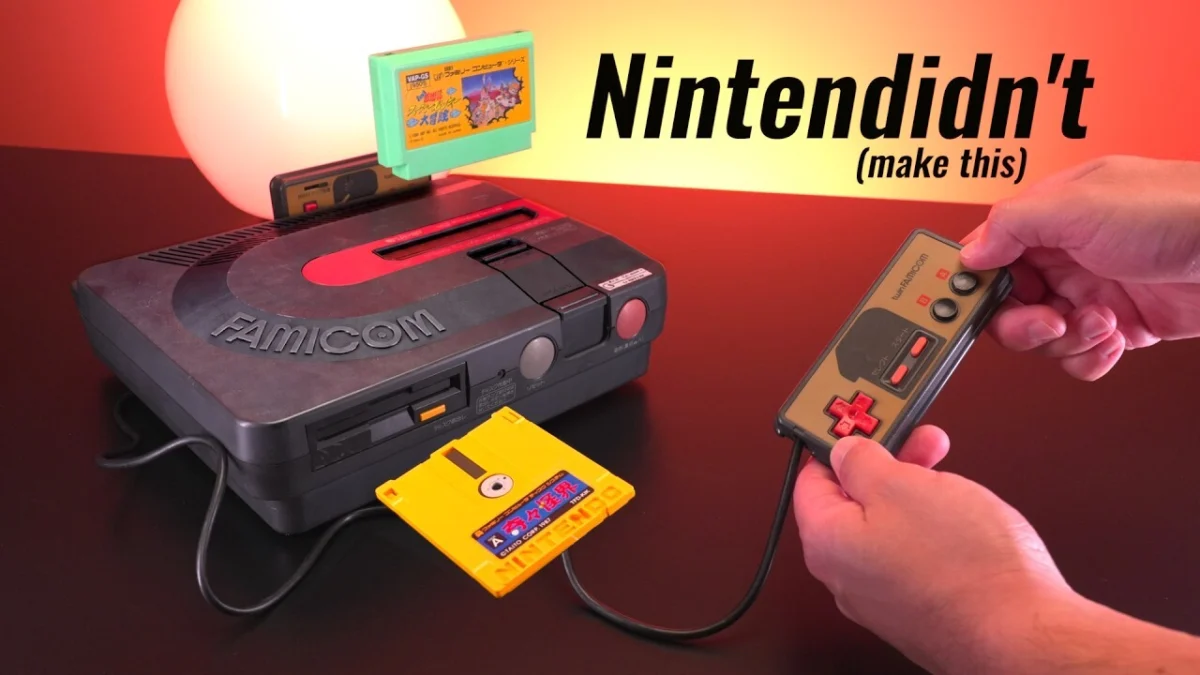
The landscape of retro video game hardware restoration recently gained a definitive masterclass in preservation as Tito from Macho Nacho Productions published an exhaustive restoration guide for one of the most unique and sought-after pieces of 8-bit gaming history: the Sharp Twin Famicom. This hybrid system, officially manufactured by the electronics giant Sharp Corporation under an official license from Nintendo rather than by Nintendo itself, combines a standard 8-bit Famicom console with a Famicom Disk System (FDS) peripheral into a single, unified chassis. Through a detailed video walkthrough, the restoration project addresses the most common mechanical and electrical failure points plaguing these vintage units, offering enthusiasts a roadmap for returning them to pristine operating condition.
Beyond the baseline restoration process—which includes crucial capacitor replacements, drive belt renewals, and deep-cleaning protocols—the hardware modification community has begun exploring advanced audio-visual upgrades uniquely suited to this specific console. Thanks to the inclusion of a factory DIN connector on the Sharp Twin Famicom, modern modders have unprecedented opportunities to inject high-definition video signals into the vintage hardware without inflicting permanent aesthetic or structural damage on the original plastic shell.
Main Facts of the Restoration and Hardware Architecture
The Sharp Twin Famicom, originally released by Sharp Corporation in 1986 during the height of the Famicom’s commercial dominance in Japan, was designed to solve a significant consumer pain point. Standard Nintendo Famicom consoles required users to purchase the separate Famicom Disk System peripheral, which attached via the cartridge slot and added a bulky external RAM adapter, a dedicated power supply, and a floppy disk drive. Sharp streamlined this setup by integrating both systems into a sleek, futuristic clamshell-like housing available in distinct color variants, most notably red and black, with variations featuring either soft-touch or hard plastic controllers.
Over the decades, however, these machines have succumbed to age-related component degradation. Electrolytic capacitors leak and lose their capacitance, leading to audio distortion and video artifacting. More notoriously, the rubber drive belts inside the Famicom Disk System mechanism inevitably stretch, snap, or turn to a sticky, viscous residue, rendering the disk-loading mechanism entirely inoperable.
Tito’s restoration video tackles these challenges systematically. By stripping the console down to its core motherboard and internal disk drive assembly, the project demonstrates how to safely discharge and replace aging capacitors, extract and clean the gummy remnants of degraded rubber belts, and install a fresh, durable drive belt to restore standard floppy disk functionality. For collectors holding onto classic FDS titles such as The Legend of Zelda, Metroid, and the original Super Mario Bros. 2, these mechanical interventions are essential to experiencing the software as it was originally intended.
Chronology of Famicom Hardware and Evolution
Understanding the significance of the Sharp Twin Famicom requires examining the timeline of Nintendo’s 8-bit ecosystem and its hardware iterations in the Japanese market.
In July 1983, Nintendo launched the Family Computer (Famicom) in Japan, revolutionizing the consumer video game industry. The console featured a top-loading cartridge design and hardwired controllers with microphones.
By February 1986, Nintendo sought to expand storage capacities beyond traditional ROM cartridges and introduced the Famicom Disk System (FDS). Utilizing proprietary magnetic floppy disks known as Disk Cards, the FDS offered cheaper game manufacturing, save-state capabilities, and expanded audio channels, sparking massive popularity across Japan.
Later in 1986, recognizing an opportunity to capture market share among consumers who desired an all-in-one setup, Sharp Corporation partnered with Nintendo to release the Twin Famicom (Model AN-500). This unit consolidated the console and disk drive, eliminating the messy cabling of the official add-on.
In 1988, Sharp released a revised version of the Twin Famicom (Model AN-505), featuring a restyled exterior, turbo fire switches built into the controllers, and detachable control pads connected via standard 15-pin ports rather than hardwired cables.
Decades later, in the 2020s, the retro gaming preservation movement has shifted from simple playability to component-level restoration and modern display compatibility, culminating in detailed technical guides like the one provided by Macho Nacho Productions.
Supporting Data: The State of Retro Preservation and Hardware Upgrades

The economics and technical realities of retro gaming preservation have evolved rapidly over the last ten years. According to community data from hardware preservation groups, nearly 90% of unserviced Famicom Disk Systems and Sharp Twin Famicoms encountered today suffer from deteriorated drive belts that require immediate replacement. Furthermore, aging through-hole capacitors on boards manufactured nearly forty years ago frequently operate outside their intended voltage tolerances, increasing the risk of permanent trace corrosion if left unaddressed.
While restoring a unit to factory specifications remains the gold standard for purists, the technical specifications of the Sharp Twin Famicom offer unique pathways for modern video integration. Standard original Famicom hardware outputs only radio frequency (RF) or basic composite video, which looks exceptionally poor on modern high-definition flat-panel displays. Modifying a standard Famicom to output RGB or HDMI typically requires drilling holes in the chassis for custom video ports or replacing existing RF jacks.
The Sharp Twin Famicom, however, stands apart from almost every other 8-bit Nintendo model due to its integrated multi-pin DIN connector. This factory port opens the door for advanced video modifications without requiring destructive modifications to the console’s outer shell.
Technical Analysis: Maximizing Video Quality via the DIN Connector
For enthusiasts looking to push the graphical capabilities of their restored Sharp Twin Famicom into the modern era, two primary modification pathways have emerged as industry favorites within the technical community: the NESRGB kit and the Lumacode board.
The NESRGB kit has long been celebrated as the premier method for extracting true RGB video from Nintendo’s 2C02 Picture Processing Unit (PPU). By routing signals through a custom encoder board, users can achieve pristine RGB, S-Video, and component video outputs. In the case of the Sharp Twin Famicom, this high-quality video signal can be routed directly through the existing factory DIN connector, eliminating the need to cut new holes in the chassis—a practice anathema to serious hardware preservationists.
Alternatively, the recently popularized Lumacode mod presents an even less intrusive option for users pairing their retro consoles with modern high-end scalers such as the RetroTINK-5X/4K or the Open Source Scan Converter (OSSC). Lumacode bypasses traditional analog-to-digital conversion bottlenecks by extracting digital luma and chroma directly from the PPU pins.
From an installation standpoint, a Lumacode mod inside a Sharp Twin Famicom approaches the ideal of a complete "no-cut" modification. The daughterboard can be securely seated directly onto the rear pins of the PPU, with minimal solder points required. Technical analysis of the Twin Famicom’s internal wiring suggests that the factory DIN connector even features unused pins. This structural quirk implies that skilled technicians could potentially wire the digital Lumacode output directly through the stock port using a custom, shielded external cable, avoiding the need to cut traces on the original printed circuit board (PCB) entirely.
If a user ever wished to return the console to its factory-original state, a Lumacode installation could be cleanly reversed in minutes using standard desoldering braid. While traditionalists will always advocate for preserving the standard composite or RF output of a fully restored vintage unit, the flexibility afforded by the DIN connector ensures that modern display integration is both clean and reversible.
Broader Impact and Implications for the Retro Gaming Community
The resurgence of interest in hardware like the Sharp Twin Famicom highlights a maturation within the retro gaming hobby. What began as casual collecting in the late 1990s and early 2000s has transformed into a rigorous discipline encompassing electrical engineering, materials science, and digital preservation.
Content creators and hardware engineers who document these restoration processes play a vital educational role. By breaking down complex electronic repairs—such as capacitor ESR (Equivalent Series Resistance) testing, drive belt calibration, and fine-pitch soldering—into accessible digital media, these creators empower everyday hobbyists to save pieces of electronic history from being discarded as e-waste.
Furthermore, the intersection of vintage hardware and modern FPGA or scaling technology ensures that classic 8-bit software libraries remain vibrant and playable. Whether an enthusiast chooses to enjoy the authentic, slightly soft composite video output on a vintage cathode-ray tube (CRT) television or route a crystal-clear digital signal through a modern line doubler onto an OLED display, the underlying foundation remains the same: meticulous mechanical and electrical restoration.
As supplies of original replacement parts dwindle and the community relies increasingly on third-party reproduction drive belts, precision capacitors, and custom adapter boards, the documentation of these restoration workflows becomes permanently valuable. Projects like the Macho Nacho Productions Sharp Twin Famicom restoration serve not only as a practical how-to guide for collectors but also as a permanent digital archive of how mid-1980s Japanese consumer electronics can be kept alive for generations to come.